


In this article, we are going to describe the process of connecting Cisco FirePower Threat Defense with Splunk in the case of using the Cisco Firepower Management Center.
The Main Reason to Connect CISCO Firepower eStreamer to Splunk SIEM
Cisco ASA FirePower is Next Generation Firewall.
The main features:
- Application Control
- Intrusion Protection
- Anti-Malware
- URL Filtering
That is why it is one of the most important log sources for your SIEM solution. It will help you to monitor your network. There are a lot of dashboards that can be useful for your SOC/NOC. Also, this integration includes all necessary staff for data models mapping, so you will be able to install the app with correlation rules, and turn on CR you are interested in.
First of all, we are about to share some notes about the preparation for this task. When the necessity of log collection from Cisco Firepower appeared, guys who did it before said that it was a really difficult task. There was an add-on that was written in Perl and during the configuration process, you received too many errors and had no idea how to manage it. But when we started reviewing possible methods, we found new opportunities to provide this.
So let’s review possible methods of sending logs from Firepower Threat Defense to Splunk.
There are two variants:
- Through syslog
- Through eStreamer.
Connection via Syslog Configuration
If we are talking about Cisco Firepower syslog configuration, first of all, it’s not a very reliable way to send logs. Even Splunk doesn’t advise you to use it if there is another way in place. On the other hand, we should manually create all necessary alerts via Cisco Firepower Management Center. And as we read on forums, if we use syslog there, fewer dashboards will be riched by default.
Pros:
- Simple configuration
Cons:
- Unsecured logs forwarding
- Issues with parsing
- Impossible filtering
Connection via eStreamer
The other way is sending logs via eStreamer. When we first heard about this method, there were many problems with perl modules and other technology which was used by the Splunk eStreamer Add-on. Let’s have a closer look at eStreamer.
The FireSIGHT System Event Streamer (eStreamer) uses a message-oriented protocol to stream events and host profile information to the client application. Your client can request event and host profile data from a Defense Center, and intrusion event data only from a managed device. The client application initiates the data stream by submitting request messages, which specify the data to be sent, and then controls the message flow from the Defense Center or managed device after streaming begins. More details you can find here. The other feature of using this method is that communication between devices is encrypted over SSL.
That’s why there are many recommendations to use eStreamer protocol for log collection instead of syslog. So we are about to share our experience of configuration log collection based on eStreamer protocol.
Pros:
- Parsing of data
- Secured logs forwarding
- Great possibilities for filtering
- Integration with an app (dashboards, alerts from the box)
Cons:
- The difficult process of configuration
- Need to use Heavy forwarder (or instruction from BONUS) for each next device
How to Configure eStreamer to Connect to Splunk
Check the eStreamer latest version
First of all, we found the Splunk Add-on for eStreamer.
You can find the latest version by the links below
eStreamer Splunk solution which is available for Cisco Firepower customers running FMC version 6.x – Splunk Cisco eStreamer eNcore add-on and app.
https://splunkbase.splunk.com/app/3662/
https://splunkbase.splunk.com/app/4388/
Check if FTD and FMC Are In One Network
There is one important thing here – FTD and FMC should be in one network as Splunk with eStreamer add on. Here one interesting thing could appear – if you have installed Splunk in the cloud (such as AWS, Azure, or Google Cloud) and have an office, which is located in a business center where your local network is hosted behind the NAT with one white IP address for many companies. Your Splunk wouldn’t have the possibility to communicate with your device directly.
There are two possible solution methods here:
- The first one is to organize Destination NAT, or port forwarding on the core router for your Firepower Threat Defense appliance. But we haven’t tested it, so maybe it won’t work.
- Another one is to create Splunk Heavy Forwarder in your corporate network with the possibility of an add-on to access FTD and FMC devices directly.
As we understand the version of Splunk Cisco eStreamer eNcore add-on and app (the new one) is developed for the second scenario. Because the add-on installs on the heavy forwarder and provides only log collection, the other part is eStreamer eNcore app for Splunk which provides log transformation, and data model log mapping to CIM, and consists of many dashboards for monitoring.
Installing and configuration of ASA Firepower integration
Step 1. Preconfiguration
Before the start, we should have configured Splunk instance. In our case, we have installed it on Ubuntu server, because Cisco eStreamer eNcore add-on works only on Linux systems.
Don’t forget that all commands/changes you should run from the user you run Splunk.
We should check if all required packets and libs are installed. They are:
- Python 2.7, Python 3.6+
- openSSL(pyOpenSSL)
If it isn’t in place, you can simply install it using your packet manager.
Step 2. Configuration
1. After that, we are going to download eNcore add-on http://apps.splunk.com/app/3662 and install it on the Splunk instance.
2. You must have a valid PKCS12 file for your Splunk server. Once you have the PKCS12 file you must rename the file to “client.pkcs12” and place it on the Splunk server here:
- $SPLUNK_HOME/etc/apps/TA-eStreamer/bin/encore/client.pkcs12
- This will require some form of SSH, SCP, or console access to the server.
3. Next visit Splunk web console. Before making any further steps be certain that all necessary inputs are enabled. Go to Settings -> Data inputs:
- In File & directories check that $SPLUNK_HOME /etc/apps/TA-eStreamer/data is enabled.

- After that go to the Script and check that all script inputs from TA–eStreamer app for Splunk are enabled.

- If all the necessary inputs are enabled, the next step is to navigate to the directory $SPLUNK_HOME /etc/apps/TA-eStreamer on the Splunk instance.
- To set the homepath (SPLUNK_HOME) of your SPLUNK_HOME install variable, execute the following command:
export SPLUNK_HOME=/opt/splunk
Where /opt/splunk is the home location of your Splunk install if this is different change accordingly. You will then likely see the following error if you run the startup/test script: **/opt/splunk/bin/openssl: error while loading shared libraries: libssl.so.1.0.0: cannot open shared object file: No such file or directory** To resolve this, add one additional setup variable for the Splunk Lib path, it is commented out in the script, you will need to run the following command prior to executing the setup script:
export LD_LIBRARY_PATH=/opt/splunk/lib
Setting the SPLUNK_HOME and LD_LIBRARY_PATH is contained to the local terminal session, to persist these values perform the following:
Edit the ~/.bash_profile file
Add the export variables from above as follows:
-export SPLUNK_HOME = /opt/splunk
– export LD_LIBRARY_PATH=SPLUNK_HOME/lib
Save the file, then run source ~/.bash_profile.
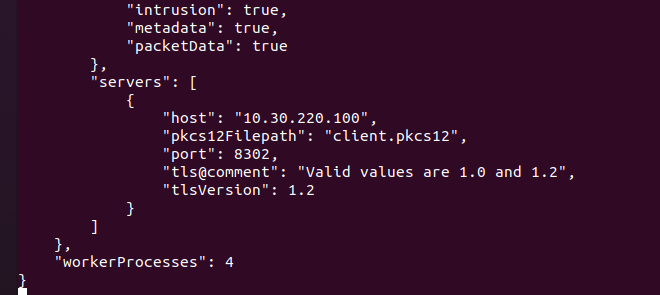
- Modify the estreamer.conf file to point to your Firepower Management Center server host IP address:
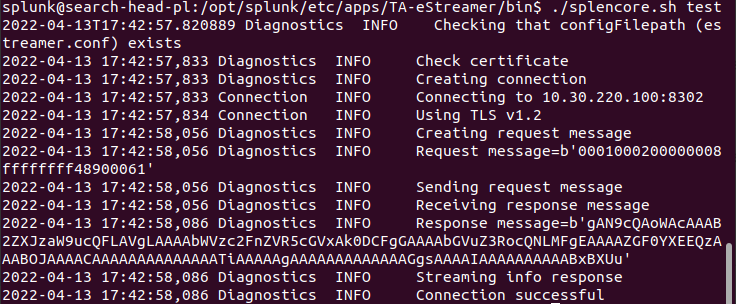
- Run the ./splencore.sh test command
- Enter the password for the client.pkcs certificate, it will fail initially and prompt you to enter the following commands:
Command 1:
/opt/splunk/bin/openssl pkcs12 -in “client.pkcs12” -nocerts -nodes -out “/opt/splunk/etc/apps/TA-eStreamer/bin/encore/10.30.220.100-8302_pkcs.key”
Command 2:
/opt/splunk/bin/openssl pkcs12 -in “client.pkcs12” -clcerts -nokeys -out “/opt/splunk/etc/apps/TA-eStreamer/bin/encore/10.30.220.100-8302_pkcs.cert”
- Enter the Firepower Management Center client.pkcs certificate password after each prompt, if successful you will see the text “MAC verified OK” after each command.
- Run the ./splencore.sh test command once more, the output should look like this:
Step 3. Installing and configuring Splunk eStreamer eNcore App
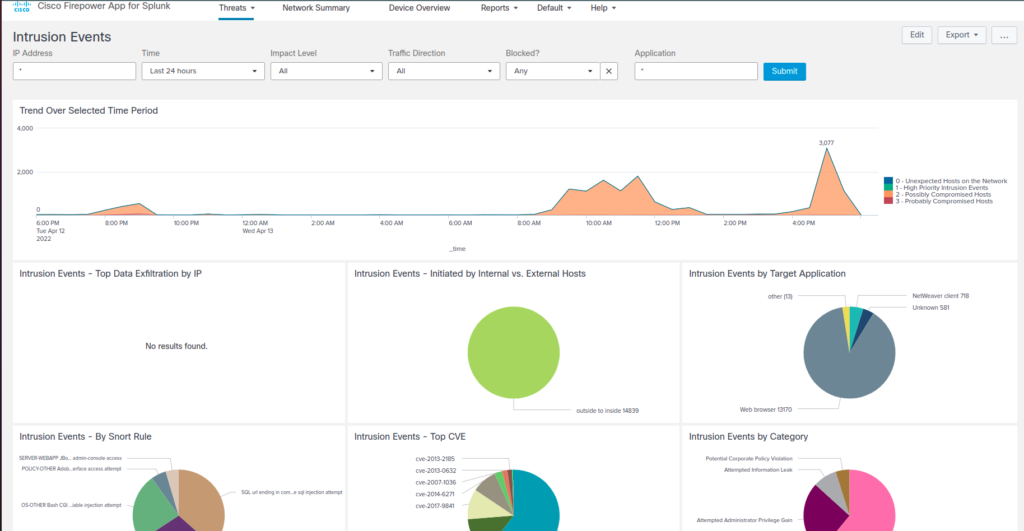
The Cisco Secure Firewall App for Splunk has to be installed on the Search Head. You can complete that through the web interface and App management by installing from Splunkbase directly or from the file on your local computer.
BONUS: How to Duplicate Configuration Steps For New Firepower devices
In case you have several Firepower devices and it is impossible to configure HF for both of them, you can duplicate the add-on and configure it for another device. It looks simple but you need to change all necessary paths, for all inputs/scripts. Example:
1.cp -R /opt/splunk/etc/apps/TA-eStreamer /opt/splunk/etc/apps/TA-eStreamer-ua
2. Change all paths and app names in the new app, it will be helpful to use the command:
grep -rnw ‘/opt/splunk/etc/apps/TA-eStreamer-ua’ -e ‘TA-eStreamer’
Also, you can use ctrl+w hotkey if you use the nano editor
For my case I edited the next files:
- /opt/splunk/etc/apps/TA-eStreamer-ua/local/inputs.conf
- /opt/splunk/etc/apps/TA-eStreamer-ua/default/inputs.conf
- /opt/splunk/etc/apps/TA-eStreamer-ua/app.manifest
- /opt/splunk/etc/apps/TA-eStreamer-ua/bin/configure.sh
- /opt/splunk/etc/apps/TA-eStreamer-ua/bin/splencore.sh
- /opt/splunk/etc/apps/TA-eStreamer-ua/bin/setup.xml
- /opt/splunk/etc/apps/TA-eStreamer-ua/default/app.conf
- /opt/splunk/etc/apps/TA-eStreamer-ua/releases.md
- /opt/splunk/etc/apps/TA-eStreamer-ua/TA-eStreamer.aob_meta
3. After that, you can paste pkcs file and repeat the configuration steps for a new firepower
Recommendation: use a unique source for each device (you can change it in the monitor stanza in inputs.conf)