


Google Workspace now provides robust Windows device management — a truly advanced mobile device management solution from Google. This solution makes enrolling and managing all your devices effortless while keeping everything centralized in your Google Workspace environment. Every device is automatically assigned to the corresponding user since Google Workspace is, first and foremost, an Identity and Access Management (IAM) platform. This automatic device tracking and assignment make managing devices both streamlined and secure. Additionally, you can fine-tune and enforce various policies to meet different needs, including compliance requirements.
According to the 2024 Data Breach Investigations Report by Verizon , 38% of breaches involved credential theft. Moreover, “Over the past 10 years, stolen credentials have appeared in almost one-third (31%) of breaches.” To mitigate this risk, implementing the Google Credential Provider for Windows (GCPW) is essential. GCPW replaces vulnerable local accounts with secure Google-based authentication, enabling users to sign into Windows devices with their Google Workspace accounts. This solution enforces Single Sign-On (SSO), Multi-Factor Authentication (MFA), and centralized password policies, enhancing security. Additionally, GCPW can be configured to automatically enroll devices into Windows Device Management, ensuring a seamless and secure user experience while centrally managing policies and controls.
In this article, we’ll explore how to organize device management and provide step-by-step instructions to help you secure your Windows devices with Google MDM. Let’s get started — because effective device management isn’t just about compliance, it’s about safeguarding what matters most.
Stay Ahead of Cyber Threats and Protect Your Workspace
How to Configure GCPW
Configuring Google Credential Provider for Windows (GCPW) is essential for integrating Windows devices with Google Workspace, enabling secure sign-ins and streamlined device management. So, let’s take a look at this process in detail.
1. In the Google Admin Console, go to Devices > Mobile & endpoints > Settings > Windows. Click on GCPW settings.

2. Turn on Enroll in device management, and configure other settings as needed.
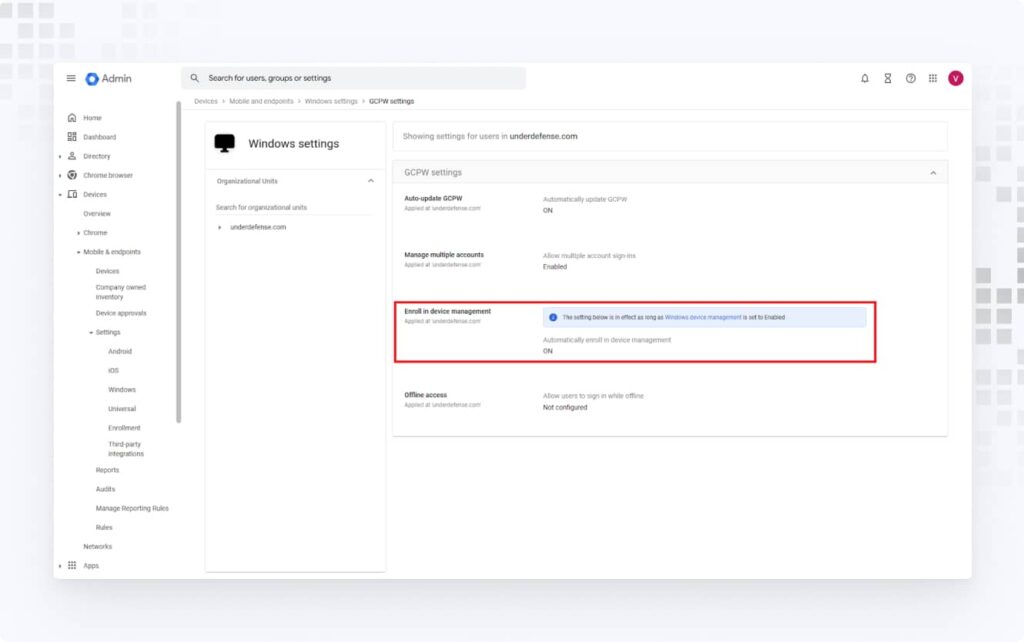
3. Go back and enable Windows device management.
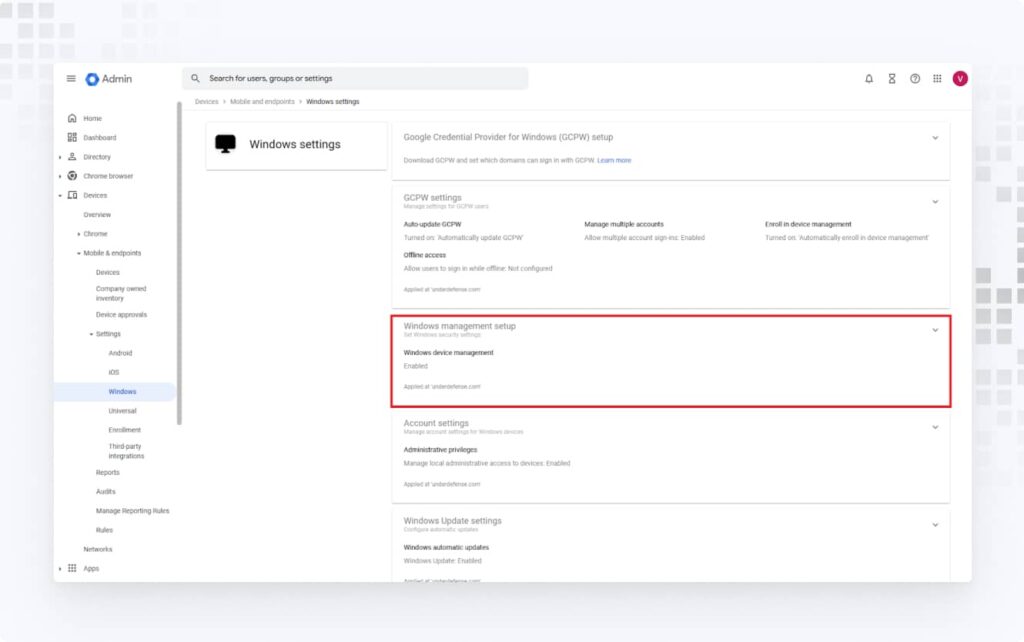
4. Go to Account settings and enable Manage local administrative access to devices. Under User account type, select either Standard User or Local Administrator user, depending on how your organization manages device users. If you choose a standard user, you can specify a list of users in Accounts with local administrative access to grant administrative rights.
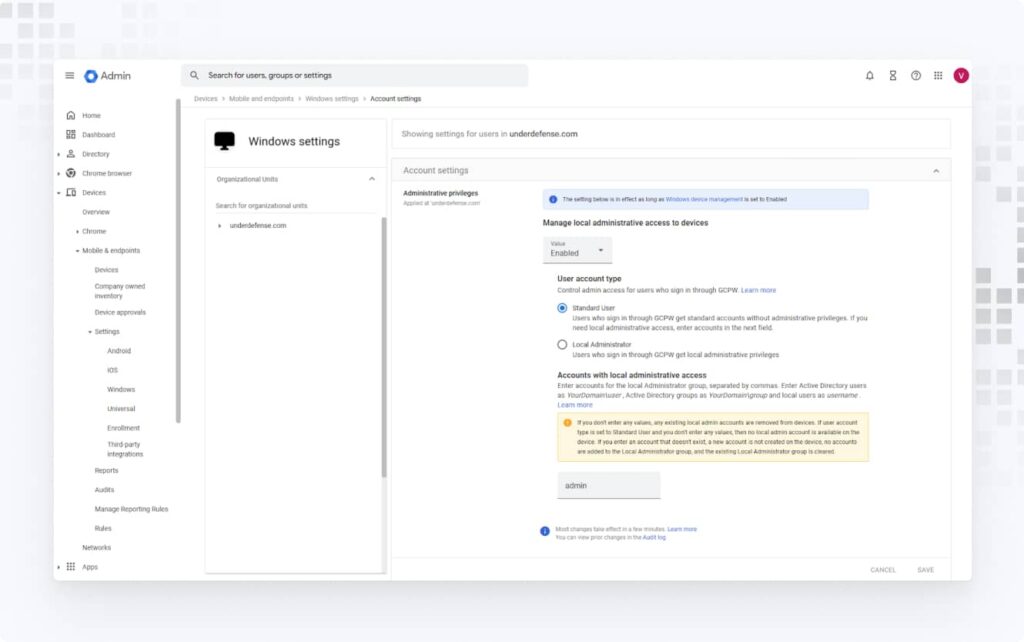
Note: If you specify a non-existent user in this list, that user will not be created and administrative rights will be removed for all other administrative users. Moreover, if you choose a standard user in the previous step and do not list any admins here, all admins on the device will be removed, risking device lock.
How to Install GCPW
Installing Google Credential Provider for Windows (GCPW) allows users to sign in to their Windows devices using Google Workspace credentials, enhancing security and streamlining access management. This installation process ensures seamless integration with Google’s device management features, enabling better control and protection of enterprise data.
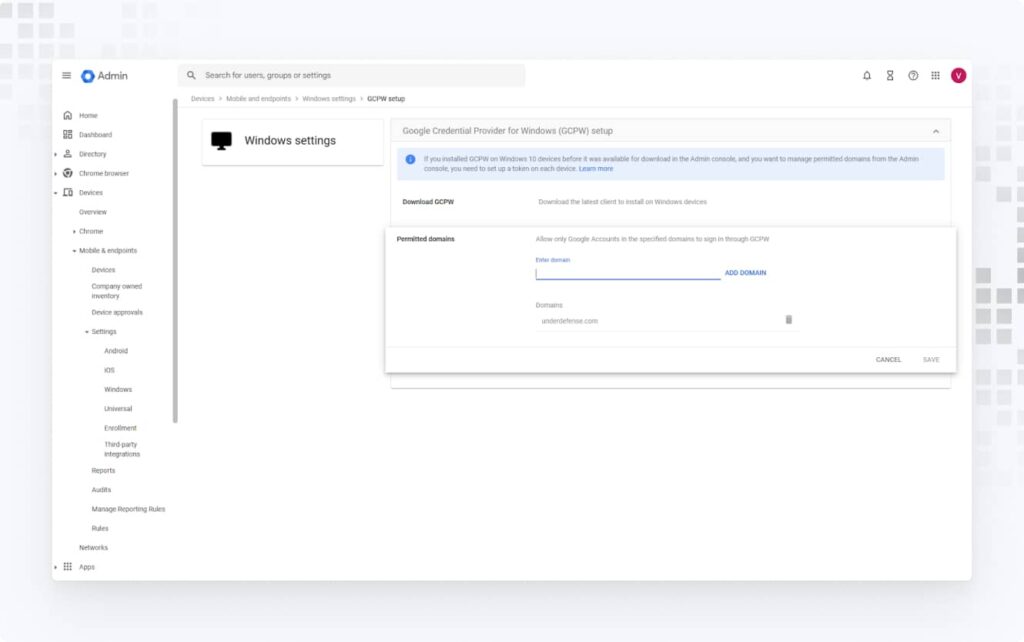
1. In the Google Admin Console, go to Devices > Mobile & endpoints > Settings > Windows. Click on Google Credential Provider for Windows (GCPW) setup.

2. Click on Permitted domains and enter the domain that you allow for login via GCPW.
3. Click on Download GCPW to download the latest client for installation on Windows devices. Also, download the registry file to set the client token so that GCPW settings are retrieved from the admin console.
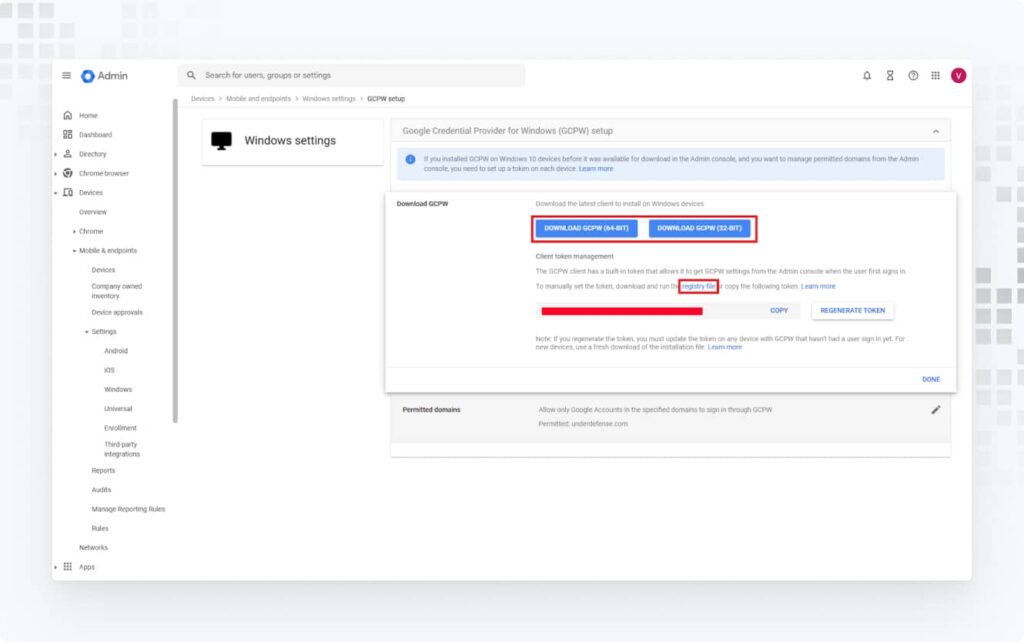
4. On the Windows device, run the GCPW installer from an administrator account. After installation, apply the registry file to set the token.
Note: For GCPW to work correctly, Google Chrome must be pre-installed on the device since GCPW uses GAIA (Google Accounts and ID Administration).
How to Enroll the Device via GCPW
Enrolling a device via Google Credential Provider for Windows (GCPW) ensures seamless integration with Google Workspace, enabling secure user authentication and centralized management. This process allows users to sign in with their Google credentials while giving admins better visibility and control over enrolled devices. Follow these steps to successfully enroll your Windows device using GCPW.
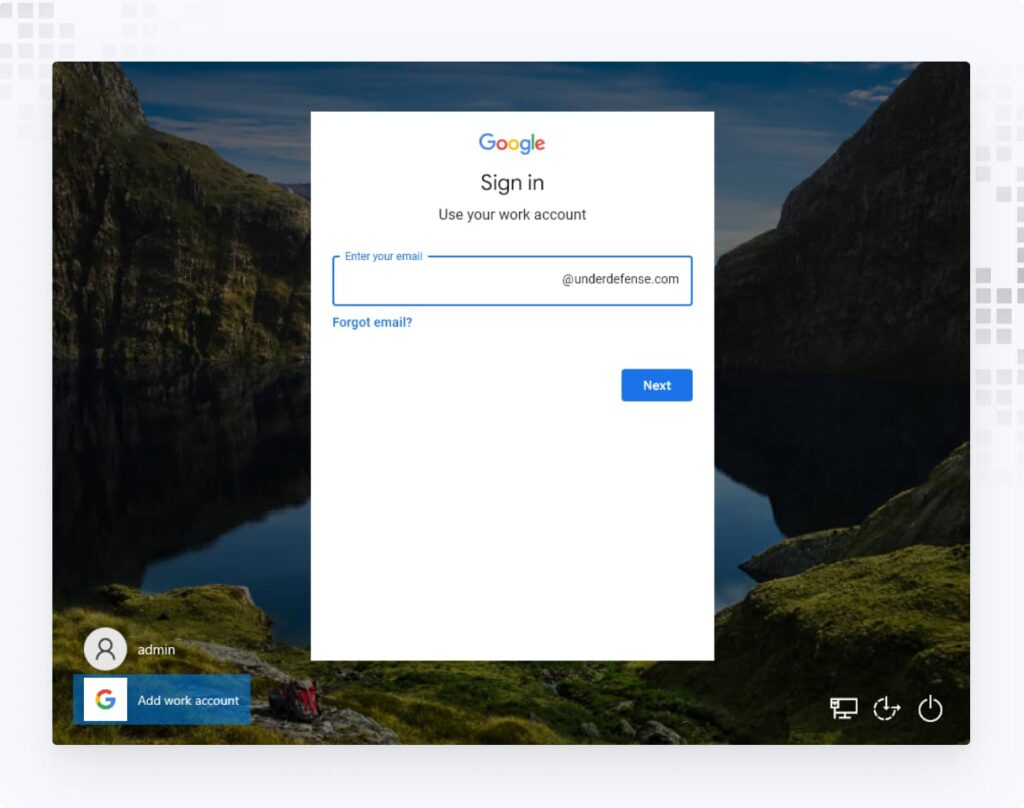
1. Once GCPW is installed, the device must be enrolled by signing in with a Google user. Log out of the current user and click Add work account > Sign in with your work account.
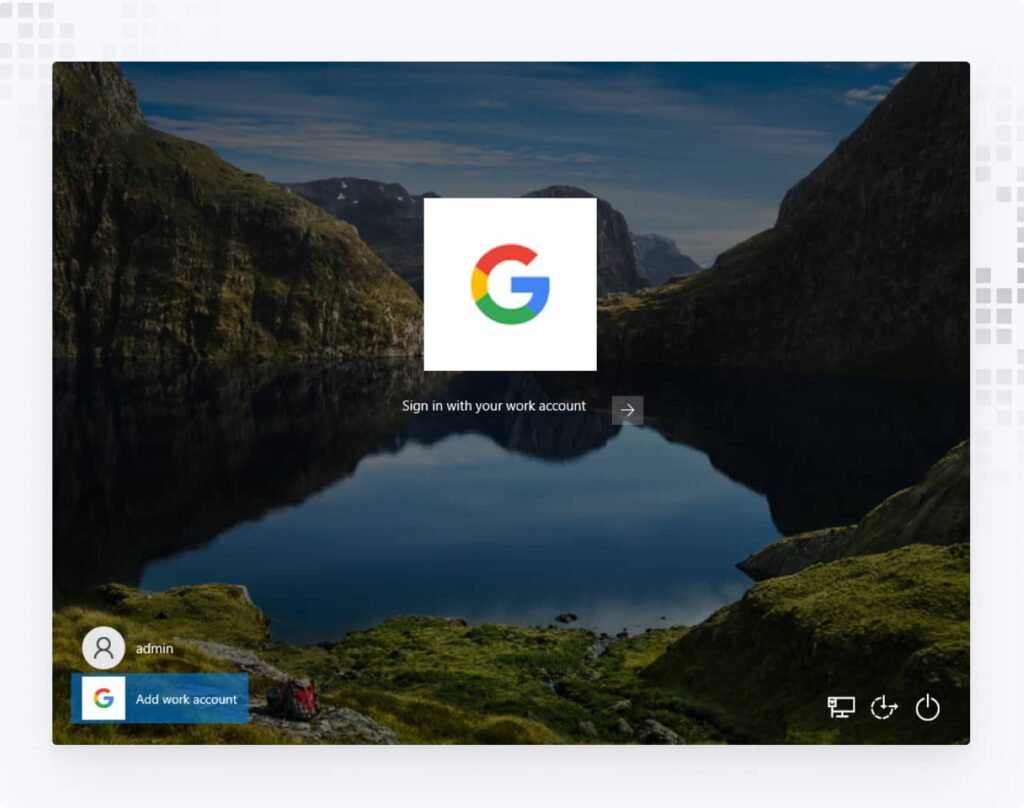
2. Enter your email and password, and, if 2SV is enforced in Google Workspace, complete the 2SV process.
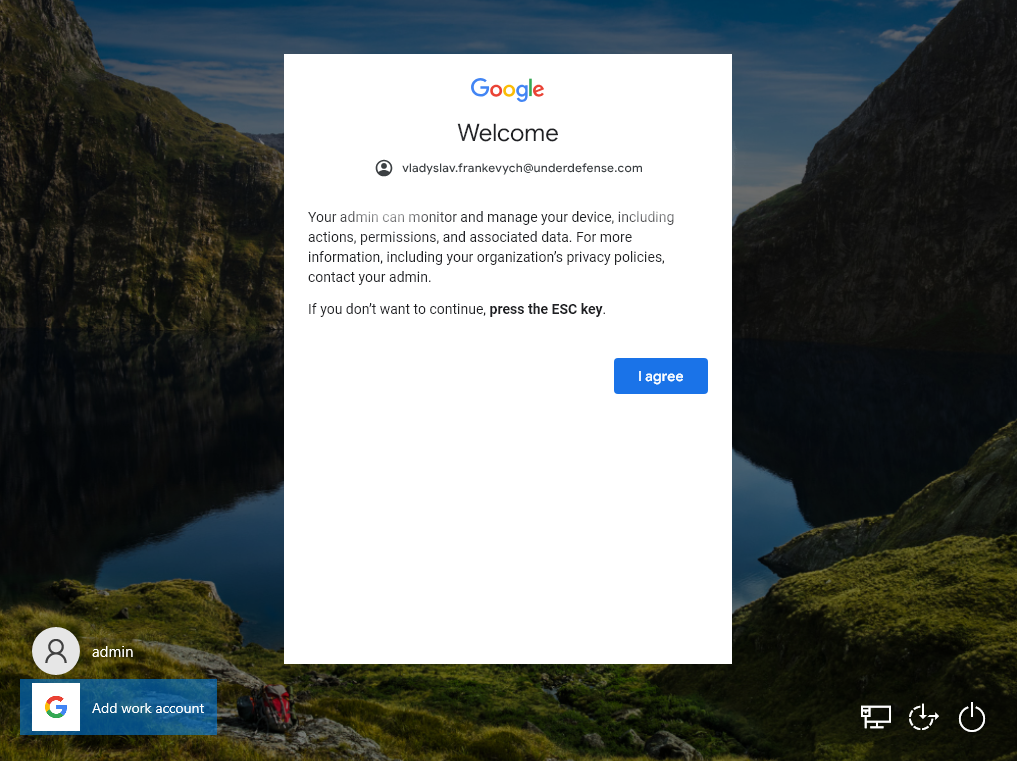
3. On the Welcome page, click I agree.
4. On the Windows device, run the GCPW installer from an administrator account. After installation, apply the registry file to set the token.
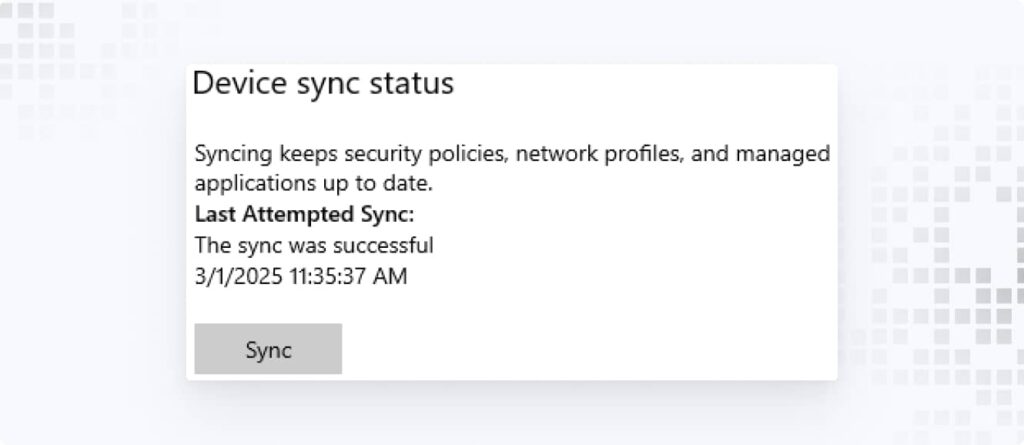
Note: It may take some time for the full setup and application of GCPW settings and policies. GCPW settings sync to devices every hour, so it can take up to 1 hour for your settings to be applied and for the user to sign in through GCPW. To manually sync the device, navigate to: Settings > Accounts > Access work or school. Click Connected to Google MDM > Info.

5. In the Managed by Google window, scroll to Device sync status and click Sync.
How to Verify Device Enrollment and Apply Policies
After enrolling a device with Google Credential Provider for Windows (GCPW), it’s important to verify the enrollment to ensure it’s properly linked to your Google Workspace. Once verified, you can apply and enforce security policies to maintain compliance and protect organizational data.
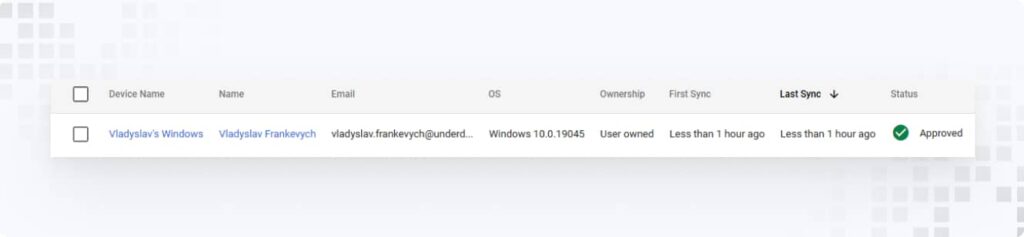
1. In the Google Admin Console, go to Devices > Mobile & endpoints > Devices and confirm that the device appears in the list.
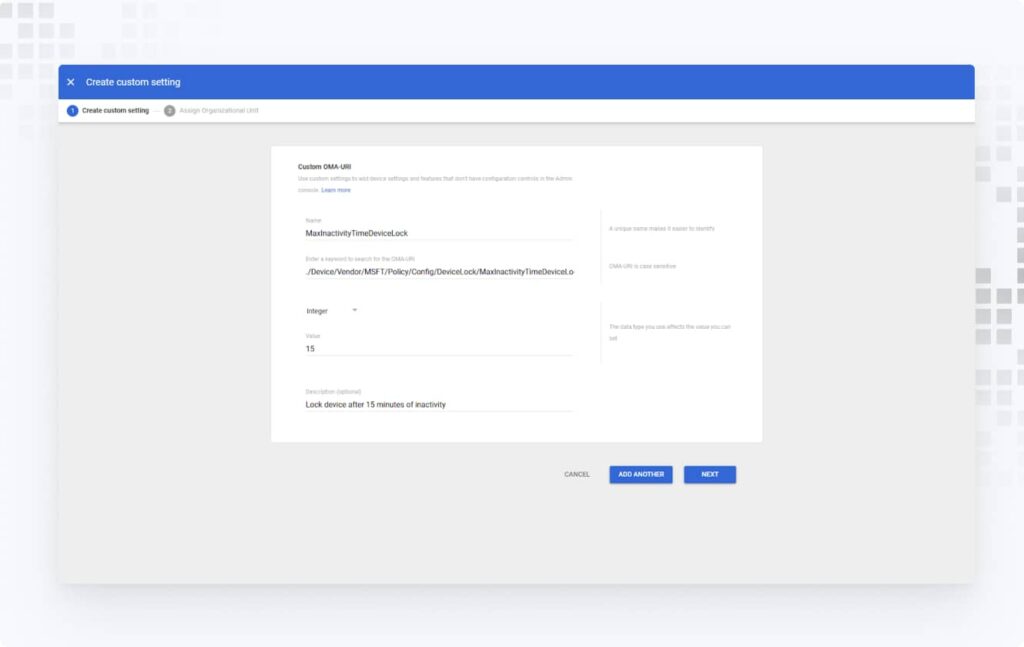
2. To apply policies to devices, navigate to Devices > Mobile & endpoints > Settings > Windows > Custom Settings.
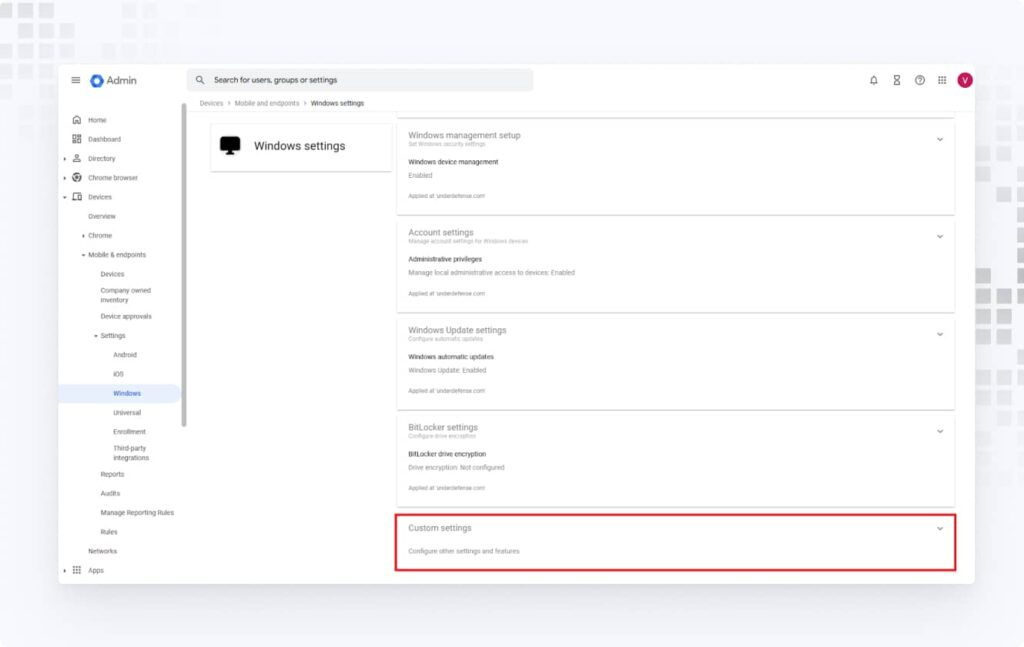
3. Click Add a custom setting to create a policy, then assign it to an organizational unit if needed. For example, create an auto-lock device policy.
Achieving Compliance with Industry Standards
Google MDM not only streamlines device management but also helps you enforce critical security controls. By applying policies through Google Workspace’s Windows device management, you can ensure compliance with various standards, frameworks, and regulations.
For example, NIST Cybersecurity Framework (CSF) provides a comprehensive approach to cybersecurity that suits organizations of all sizes. Here is an example of how you can align your device management policies with NIST CSF:
Requirement | Google MDM Implementation | NIST CSF Subcategory |
Enforce Full-Disk Encryption (BitLocker) | Configure via Windows Settings > BitLocker Settings to enable encryption for data-at-rest protection. | PR.DS-01 |
OS Updates | Enable Windows Settings > Windows Update Settings to enforce automatic security patches. | PR.PS-02 |
Remote Device Wipe | Use the "Wipe Device" action under the Device for incident containment. | RS.MI-01 |
Multi-Factor Authentication (MFA) | Enforce 2-Step Verification (2SV) via Security > Authentication > 2-Step Verification and integrate with GCPW. | PR.AA-03 |
Track Installed Applications | Monitor via Devices > Installed Apps to detect unauthorized or harmful software. | ID.AM-02 |
Device Tracking | Collect device metadata (e.g., serial number, OS version) and link to user accounts in the Devices Tab. | ID.AM-01 |
Block Compromised Devices | Use the "Block Device" action in the Devices Tab to restrict access during incident response. | RS.MI-01 |
Enforce Least Privilege | Restrict admin rights via Windows Settings > Account Settings > Administrative Privileges. | PR.AA-05 |
Prevent Unauthorized Software | Configure via OMA-URI ./Device/Vendor/MSFT/EnterpriseDesktopAppManagement/MSI/DownloadInstall (Custom Settings) to auto-install approved apps including antivirus software. | PR.PS-05 |
Limit Password Attempts | Configure via OMA-URI ./Device/Vendor/MSFT/Policy/Config/DeviceLock/MaxDevicePasswordFailedAttempts (Custom Settings). | PR.AA-03 |
Block Removable Media | Configure via OMA-URI ./Device/Vendor/MSFT/Policy/Config/Storage/RemovableDisksDenyAllAccess (Custom Settings). | PR.PS-05, PR.DS-01 |
Enforce Screen Lock Timeout | Configure via OMA-URI ./Device/Vendor/MSFT/Policy/Config/DeviceLock/MaxInactivityTimeScreenLock (Custom Settings). | PR.AA-06 |
Enable Audit Logging | Configure via OMA-URI ./Device/Vendor/MSFT/Policy/Config/Security/AuditLogRequired (Custom Settings). | PR.PS-04 |
Your Corporate Assets Deserve 24/7 Protection — Let’s Make It Happen
Need help? We’ve got you covered
At UnderDefense, our security experts specialize in providing comprehensive, cutting-edge solutions to safeguard your organization’s digital assets. From proactive threat detection to strategic cybersecurity guidance, we offer a wide range of services tailored to meet your unique security needs.
Why choose us?
- MDR Services: Managed Detection and Response (MDR) provides continuous monitoring and rapid incident response using AI-powered threat detection and expert human analysis.
- vCISO Services: Virtual Chief Information Security Officer (vCISO) service offers strategic guidance, compliance automation, and streamlined processes, allowing your team to focus on core business objectives.
- Penetration Testing Services: Penetration Testing service provides a thorough evaluation of your systems, identifying potential vulnerabilities and weaknesses.