


How to Protect Against LLMNR / NBT-NS Attacks, Zerologon, LLMNR,NTLM RELAY
Introduction
More and more companies are looking for solutions to minimize risks and increase levels of cybersecurity by disabling or taking preventive actions when Link-Local Multicast Name Resolution (LLMNR) and NetBIOS Name Service (NBT-NS) protocols are running on network hosts, as well as the consequences of this operation—getting the domain admin rights.
To compromise domain admin accounts and successfully attack the Windows-based infrastructure, hackers most often use these three protocols (if they are enabled by default on hosts). On non-Window hosts, in an active zero-configuration technology, protocols have a different naming, but the purpose is the same.
Below, you can find detailed information about each protocol and how you can secure your infrastructure on a step-by-step basis as well as additional preventive measures we recommend taking into account.
Note: Before completing the next steps, we strongly recommend backup and trying first on a copy of the production environment
#1 Link-Local Multicast Name Resolution (LLMNR) and NetBIOS Name Service (NBT-NS)
If you use a DNS server in your infrastructure, consider disabling activities, such as LLMNR/NBT-NS, which is created by a Microsoft vendor, implemented in their operating system, and is a small part of a zero-configuration networking. Other protocols that are a part of this technology are also vulnerable to Man-in-the-Middle (MITM) attacks.
Also note, attempting to create a MITM attack technique will be unsuccessful due to protocols running on multicast and broadcast addresses, including LLMNR and NetBIOS, if your infrastructure is deployed in the most popular cloud providers, because they don’t support multicast and broadcast addresses.
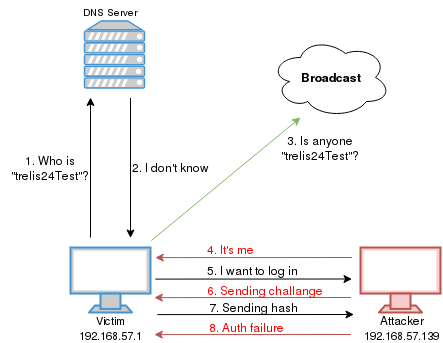
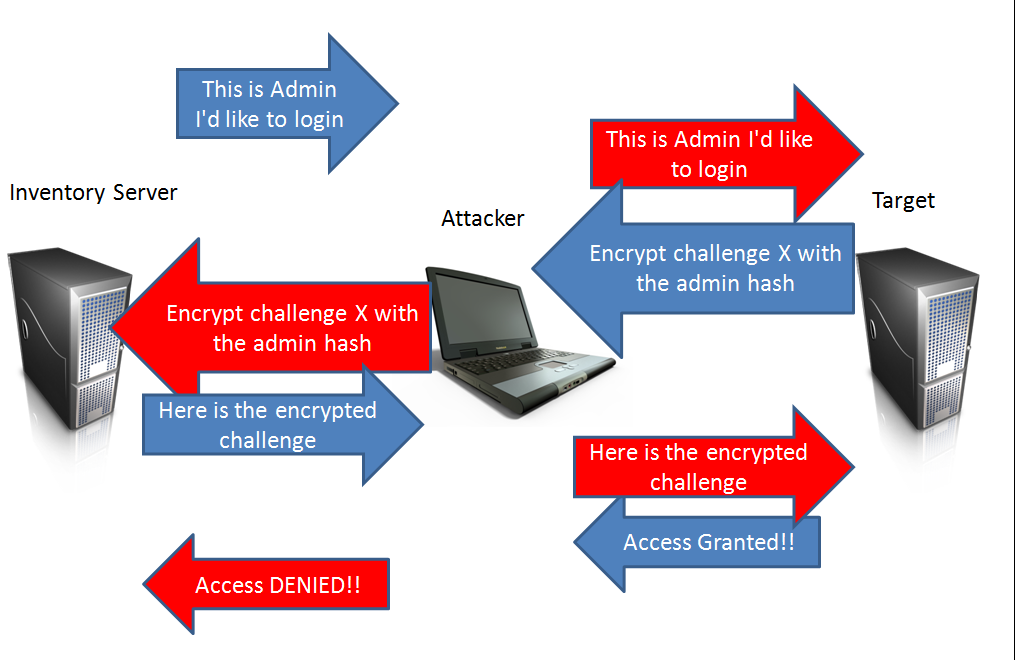
LLMNR/NBT-NS is a protocol used to allow name resolution and services without the requirements of a DNS server. It is often used to create a Man-in-the-Middle (MITM) attack, which is the first charge in the chain for subsequent attack techniques usually on domain servers protocols, such as NTLMv2, Kerberos and others, depending on your infrastructure. A screenshot below shows the concept of an attack when the LLMNR/NBT-NS protocol is running on a network.
Here you can learn how to protect yourself from this attack.
To help detect such an attack and what preventive actions can be taken, consider the following options.
Detecting option
In the operating system, monitor the event IDs 4697 and 7045 to configure sending events from the Windows platform to Security Information and Event Management (SIEM) by following the link.
Disable LLMNR/NetBIOS
For detailed information on how to configure disabling functionality, click here. After that, you can verify if via tcpdump or wireshark you cannot view the destination port UDP:137, TCP/UDP:138, TCP:139.
Option A: Disable NetBIOS via Group Policy for domain
Note: You can do it, if your host has Windows 7, or later.
Step 1. Create next PowerShell file and save it like nbt-ns.ps1:
$NBT-NS = “HKLM:SYSTEM\CurrentControlSet\services\NetBT\Parameters\ Interfaces”
Get-ChildItem $NBT-NS | foreach { Set-ItemProperty -Path “$NBT-NS\$ ($_.pschildname)” -Name NetbiosOptions -Value 2 -Verbose}
Step 2. Sign PowerShell script nbt-ns.ps1. You can find the detailed steps here. It will be best when you will have PKI in your domain.
Step 3. Connect to your domain controller.
To do so, go to Start > Administrative Tools > Group Policy Management
Step 4. Select the domain.
After that, if needed, create a new Action > Create a GPO in this domain, and Link it here…, or edit an existing one.
Step 5. Navigate to Computer Configuration > Policies > Windows Settings > Scripts > Startup > PowerShell Scripts.
Step 6. Click on Show Files to open directory by path\yourdomain\SysVol\yourdomainname\Policies\Your_GPO_GUID\Machine\Scripts\Startup and paste there script nbt-ns.ps1
Step 7. Then give file nbt-ns.ps1 permission Read&Execute for the Domain Computers group (Click right mouse on the file nbt-ns.ps1 and choose properties -> security -> edit -> add and type group name Domain Computers click check names -> ok take checkbox opposite Read&Execute column allow)
Step 8. Next enable the “Configure Logon Script Delay” and set up value to 2 (minutes) by GPO path Computer Configuration -> Administrative Templates -> System -> Group Policy section.
Step 9. After that you need to configure the executepolicy for powershell via the “Turn On Script Execution” policy GPO path Computer Configuration -> Administrative Templates -> Windows Components -> Windows PowerShell. We strongly recommend choosing policy values – Allow only signed scripts, but you need to do step 2.
Step 10. After completing these steps, reboot the host.
Disable NetBIOS run using one of the next commands:
– ipconfig /all |find “NetBIOS”
– wmic nicconfig get caption,index,TcpipNetbiosOptions
Option B: Disable NetBIOS via DHCP
1. Connect to your DHCP server.
2. Go to Start > Run and type dhcpmgmt.msc
3. Choose Scope Option or Server Option click right mouse and select Configure Option
4. Click Advanced on vendor class choose Microsoft Options
Turn on option 001 Microsoft Disable Netbios Option and set it value to 0x2
Option C: Disable LLMNR via Group Policy for domain
1.Connect to your domain controller. Go to Start > Administrative Tools > Group Policy Management.
2. Select the domain. After that, if needed, create a new Action > Create a GPO in this domain, and Link it here…, or edit an existing one.
3. Navigate to Computer Configuration > Policy > Administrative Templates > Network > DNS Client, and then open Turn off Multicast Name Resolution.
4. In a new window that opens, click Enabled, and then apply this GPO to the domain.
On the client host like Windows 10, press Win+R, type CMD, and then press Enter. In a new console window, type gpupdate /force, or reboot the client host.
Option D: Disable via the registry editor
1.Connect to your domain controller. Go to Start > Administrative Tools > Group Policy Management.
2. Create a new GPO policy, or edit an existing one.
3. Expand the GPO section by navigating to Computer (or User) Configuration > Preferences > Windows Settings > Registry click right mouse and select New > Registry Item
4. Choose action =Update Hive=HKEY_LOCAL_MACHINE
and key path =HKEY_LOCAL_MACHINE\SOFTWARE\Policies\Microsoft\Windows NT\DNSClient and set enablemulticast to 0 type of DWORD (Hex).
After completing these steps, reboot the host.
Note: You can verify if via tcpdump or wireshark (set filter to LLMNR) you cannot view destination IP, like 224.0.0.252 and UDP:5355.
Option E: Block on firewall LLMNR/NetBIOS
Find the detailed steps on how to configure Windows firewall via Group Policy here.
You can verify it via tcpdump or wireshark, so after that you can’t view destination IP, like 224.0.0.252 UDP:5355 and destination IP, like broadcast IP in subnet and ports UDP:137, TCP/UDP:138, TCP:139.
Option F: Control traffic on firewall
Control traffic on firewall TCP/UDP:445 to destination IP where it is needed and restrict use of this port to only LAN.
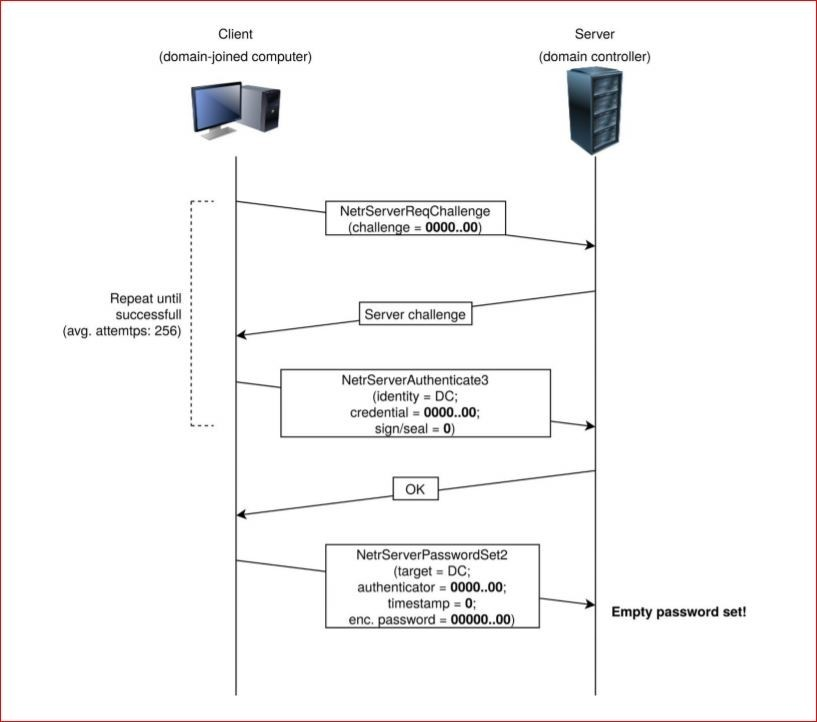
#2 Zerologon
This vulnerability exploits a cryptographic flaw in Microsoft’s Active Directory Netlogon Remote Protocol (MS-NRPC). It allows users to log on to servers that are using NT LAN Manager (NTLM).
The biggest problem with this vulnerability is that MS-NRPC is also used to transmit certain account changes, such as computer service account passwords. Thinking back to its origin, it is possible to see the rationale for adding this feature. However, the lack of validation in the source of the request to change these passwords has become a significant security issue.
To find out if this vulnerability is relevant to your environment, you can use this script (as a PoC).
Mitigation option
1. Install the patch on your Windows operating system from site vendors.
2. Set up a secure Remote Procedure Call (RPC) by following detailed instructions here.
3. Set up Network Intrusion Prevention System before Domain Controller network segments.
Pros:
- It can prevent an attack
- It does not require additional action from the cybersecurity operator
Cons:
- Can have false positive
- Can impact on performance networking
4. Setup local firewall on endpoints.
Detecting option
1.In Operating System Domain Controller, monitor Event IDs 5827, 5828, 5829, 5830, 5831, and then send them to SIEM, as described above.
2. Setup Network Intrusion Detection System before Domain Controller network segments.
Pros:
- It cannot impact the performance networking
- False positive cannot impact on traffic
Cons:
- It cannot prevent attack, only detects it
- It requires an additional action from the cybersecurity operator
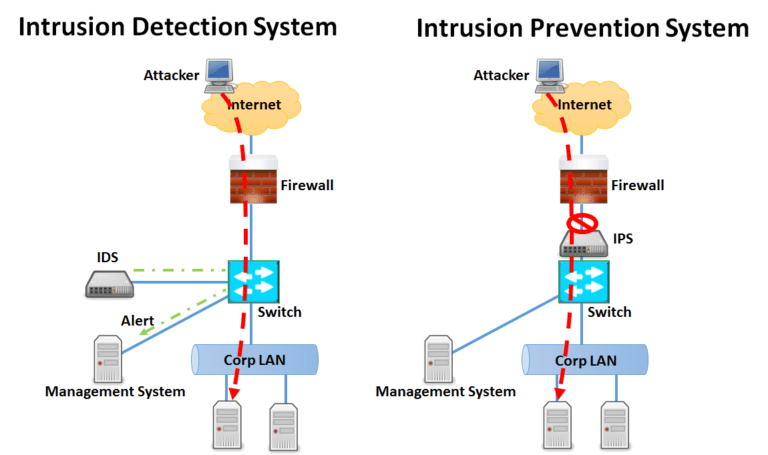
The figure below shows the difference between the IPS and IDS classes of systems.
#3 NTLM RELAY
NTLM relay attacks allow you to see actions performed on the server while impersonating the client. This attack is considered to be successful, if a hacker takes full control over the Active Directory, even if NTLMv2 protocol is used.
This vulnerability is based on misconfiguration and vulnerabilities in many other protocols: IPv6 (default value), LLMNR/NetBIOS (one of zeroconf technology described above), WPAD, ARP-Spoofing, DNS-Spoofing (cross-protocol relay).
Mitigation option
1.Require Server Message Block (SMB) signing. For more information, read the following resources:
2. Set up LDAP signing and LDAPS channel binding, as described here.
3. Disable IPv6, if not used. For more information, see this post.
4. Disable SMBv1, as described here.
5. Configure if needed or disable used WPAD by next step group policy, expand Computer Configuration -> Administrative Templates -> Windows Components -> Internet Explorer -> Disable chang ing Automatic Configuration settings and set up this value to Enable
6. Disable SMBv3 compression. For more information, read the following resources:
7. Use a firewall to prevent DNS-Spoofing, IPv6, LLMNR, WPAD, mDNS, SSDP and other vulnerabilities, if any or configured protocols by default.
8. For reduce the impact of cached hashes of password from privileged accounts on hosts, use a special type of domain group for them, such as Protected Users Security Group, more detail:
https://docs.microsoft.com/en-us/windows-server/security/credentials-protection-and-management/protected-users-security-group
9. You can check the relevance of the attack to you by using tools https://github.com/SecureAuthCorp/impacket/blob/master/examples/ntlmrelayx.py
#4 Other preventive measures
a) Protection against MitM attacks
1.Follow steps below, to reduce the impact of MitM attacks:
2. Disable IPv6 on hosts/network devices.
3. Enable the switch protection against ARP-Spoofing.
4. Enable the firewall protection against DNS-Spoofing, mDNS, SSDP on hosts.
5. Disable protocol WPAD, mDNS, SSDP on hosts.
b) MSHTML
MSHTML helps render web pages on Windows. To understand more about its potential vulnerabilities, read the resources below:
- Microsoft MSHTML Remote Code Execution Vulnerability
- Analyzing Attacks that Exploit the CVE-2021-40444 MSHTML Vulnerability
c) Windows Print Spooler Remote Code Execution (additional bonus)
Spooler manages access to printers. Here’s how to manage deployment of Printer RPC binding changes for CVE-2021-1678.
To sum up
In this post, we have unleashed the most common ways attackers use to compromise domain admin accounts via three protocols and ways to secure your infrastructure.
Contact us to learn how we can help you minimize your security risks and not only detect, but also prevent them in your day-to-day activities.